
An Easy Hack to Make Compost in Your Own Dirt Cheap Worm Lodge
by Bill Hettig (billhettig@mac.com)
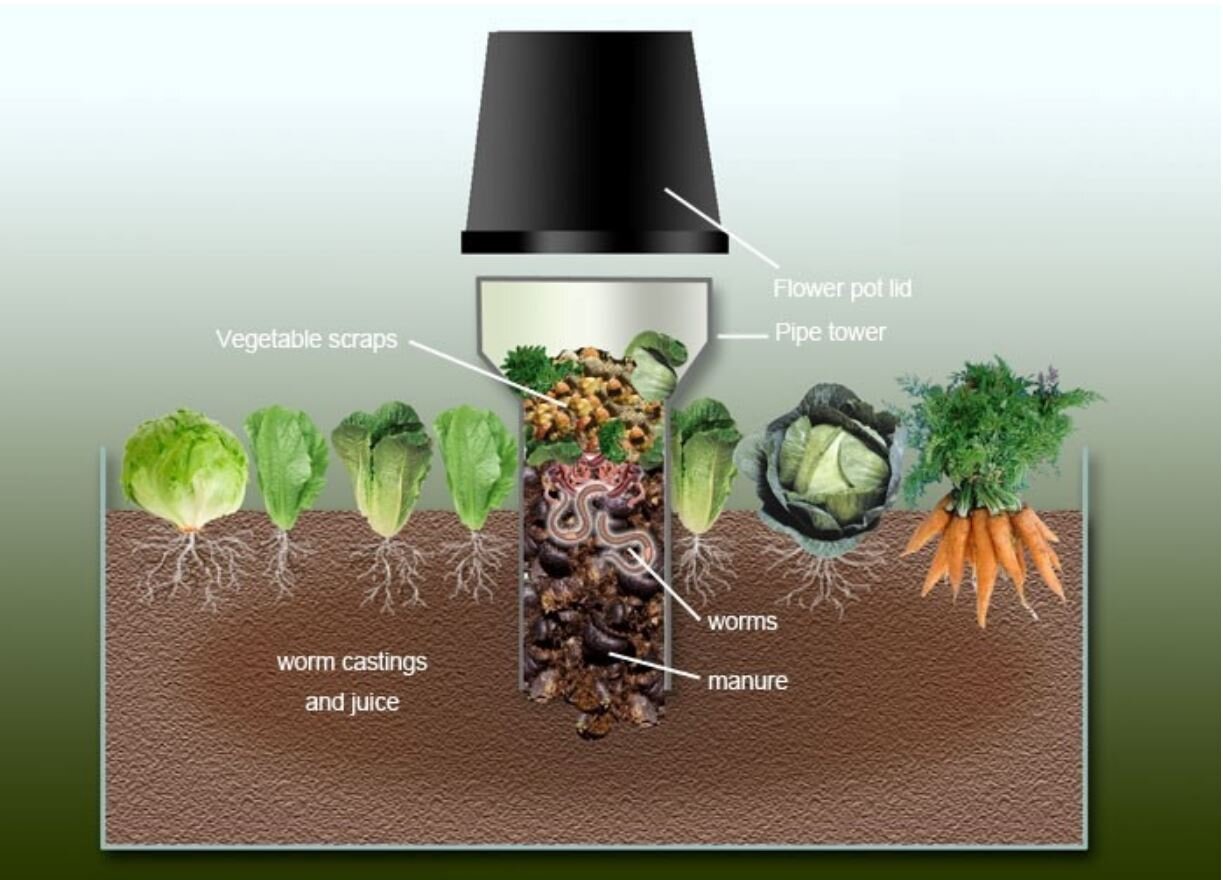
Convert kitchen food scraps into rich garden compost with the power of worms and this simple cardboard “lodge." It sets up quickly with just a drill, hacksaw, and shovel.
Install this composter with just an 8" diameter tube in your garden or any convenient spot. Once installed it requires nothing but vegetable scraps, some leaves or shredded paper, and a bit of soil.
Unlike other above ground worm cafes, this cardboard model costs under $8.00. You will also need to find a lodge “roof,” I use an inverted salad bowl!
Now your worms will produce super-rich compost that feed plants immediately surrounding your lodge, plus create additional pounds of rich compost within a couple months to dig up and spread around your garden.
The great advantage: it’s so much cooler when your worms live 18” underground! After 2-3 months the lodge will disintegrate, time to claim your compost and start another lodge or two.
HERE'S THE LINK TO THE COMPLETE PARTS AND INSTALLATION OF THE WORM LODGE.
MATERIALS:
• A 4’ x 8" diameter cardboard tube $8.00 [big box home improvement].
• 8 lbs. of manure (at home improvement center or garden shop) $7.00
• 1/4 lb. of "red wiggler" composting worms (not earthworms). (O-Town Compost sells a quarter pound for $10. Send us an email).
• Bowl or terra cotta pot to put on top of lodge as a roof
TOOLS:
- hacksaw
- drill with 1/2 inch or so drill bit
- shovel

INSTRUCTIONS:
* Use a hacksaw and cut cardboard tube to 3 ft. (Save the 1 ft. section for a future lodge).
* Drill plenty of 1/2” holes in the bottom half of the tube. Leave the top 18 inches solid.
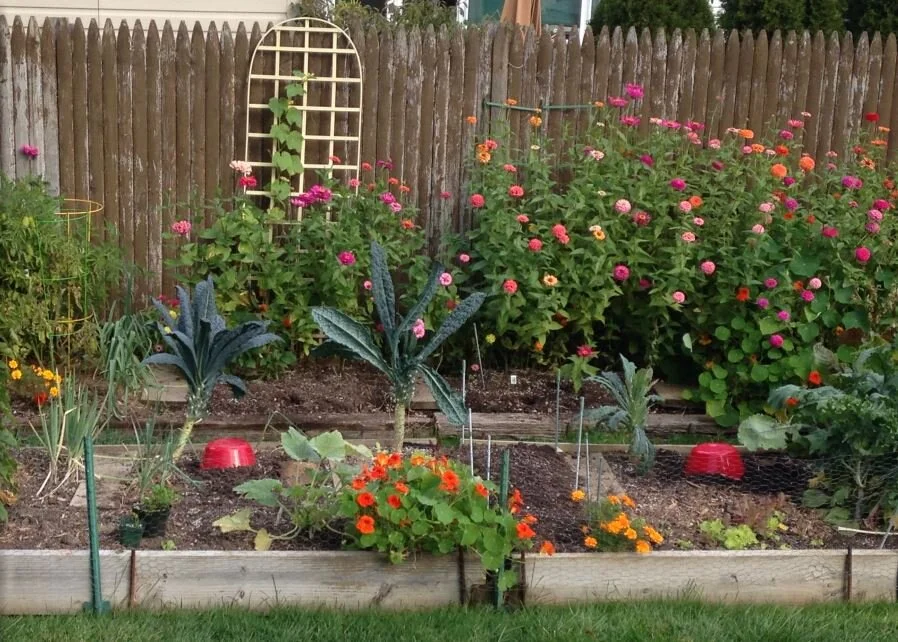
* Locate the lodge where you are growing produce or a convenient place. I place mine in the center of a raised bed; at the ready to directly feed emerging plants. (Note the red “salad bowl” caps in the garden photo..
* Dig a 2-foot deep hole and install the tube with the holes down, then backfill, leaving about 12 inches of solid tubing above ground..
* Add the manure
* Add the worms
* Top with a handful of dry leaves or shredded paper
* Add a little water if dry; DO NOT OVER WATER!
* Top with the bowl or flower pot to prevent weather or varmints from entering.
* Red wigglers can eat their weight in scraps daily. The Lodge is good for a family of two. Larger families should have a couple of Lodges or more!

TIPS:
• Worms need a little sand to digest, so mix in a tiny bit of soil with your scraps
• The moisture level for scraps should be that you could squeeze and a drop or two would come out. Lightly damp is the best consistency.
• Worms don’t like citrus peels, bones, dairy. They love coffee grounds, produce peels, soft items vegan scraps to eat. It won’t hurt to chop up for a speedier conversion.
• When setting up a new Lodge, don’t feed the worms for a few days; let them get used to their new digs.
• After about 12-16 weeks the tube will disintegrate. You can carefully dig up and save your worms and harvest the worm castings to be used elsewhere.
• Start another lodge! After 3 lodges, you will have 3 one-foot pieces of tubing saved up and you can make a fourth one, on-the-house, or on-the-lodge!
————————————————————————————————————————————————————